
The Mini Rotisserie
This all started when someone pointed out that when a Mini is completely stripped you can look right through the body shell from the engine compartment/instrument hole/rear seat squib/boot lid opening. It was suggested that if a pole could be mounted in that space the entire shell could be rotated around the axis. Someone else postulated that that is how the factory mounts the shells for painting in the first place. Stripped Mini shells weigh next to nothing (I'll tell you how much later, I intend on weighing mine before I put it back together) so any frame built for it would not have to be all that substantial.
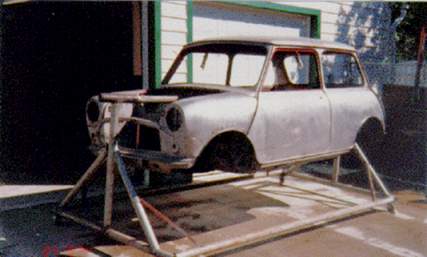
The raw material used for the frame is salvage thin-wall steel 3" fence pipe. If I were to do this again, I would use 2" square tubing, also salvage. Start by laying out and welding a square frame 5' x 10.5' (we're bilingual in Canada, metric and imperial). I put 4" square pads on the corners to attach the light duty casters. In the middle of the short side place a vertical post ~3' long and drop supporting triangulation members down to the corners (see cheesy ASCII diagram Figure 1). To stop the ends from swaying drop little triangulation pieces from the upright ends down to the long sides (cheesy Figure 2). All the weight is taken on the top of the posts where the 'bearing' is. For this I used about 10" of 3.5" exhaust pipe welded to the post top with just a little bracing. The central pole is 11.5' long and rests inside the bearings on either end supporting the car in the middle. To hold the shell at various angles I cross drilled 3/8" holes in the bearing/pole at level, upside down, left and right side up. Other odd angles were accommodated by clamping the pole to the bearing with grips.
*********************************************************
*                                                       *
* Figure 1 End view:                                    *
*         _                O  <- 3.5" bearing pipe      *
*         |                |                            *
*         |               /|\                           *
*        3.5'           /  |  \    <-triangulation      *
*         |           /    |    \                       *
*         |         /      |      \                     *
*         |       /        |        \                   *
*         _      =====================                  *
*                O                   O  <-light casters *
*                                                       *
*                <-------5'---------->                  *
*********************************************************
*                                                       *
* Figure 2 Side view:                                   *
*                                                       *
*   -  ===-----|-----+place mini here+-----|------====  *
*   |   |       \flange             flange/         |   *
*   |   |                                           |   *
*  3.5' |         (central pole is 11.5')           |   *
*   |   |                                           |   *
*   |   |\ <-triangulation                        / |   *
*   _   =============================================   *
*       O                                           O   *
*                                                       *
*       |<------------------10.5'------------------>|   *
*                                                       *
*********************************************************
Mounting the shell on the supporting pole or, um, skewer, is quite simple really, all that's required is 2 sheets of steel for flanges, about double the thickness of body steel. One is cut to the shape of the cardboard blank in the rear seat squib, the other is square about the size of the instrument binnacle. Both are attached the body in the same holes and with the same screws as the instrument binnacle and squib blanking. The pole passes through the flange as low down in the opening as can be accommodated so that rotational axis is near the centre of gravity (the floor pan is heavy compared to the roof). On my setup I cut the flange holes from the centre out so that there were about 10 triangular tangs peeled back and sticking out of the surface (think of a bullet pushing the metal out the back). When the flange is mounted and the pole inserted the tangs are clamped tight against the pole with large muffler clamps. This prevents the shell from turning at the flanges. I suppose the tangs could be welded, but I figured I didn't want to be welding inside the shell nor grinding or cutting the welds off when the painting was done.
The bearing pipe was slit length wise so that it could be clamped around the central pole using more muffler clamps to provide enough friction so that I could roll the shell and have it just balance at the angle I wanted until I could get the safety pin in place. In the end the balance was very good and I could roll the shell upside down in about 15 seconds,unassisted. Body work can be done without worrying about the loads being placed on the flanges etc, but I wouldn't recommend crawling inside the shell.
Actually getting the shell in place is the hardest part. I positioned the shell in the middle of the frame at the correct height (not easy) and, with the flanges in place, skewered the thing right up the middle! A little judicious persuading with a 5-pound sledge didn't hurt either. Once suspended, place the clamps on the flanges and you're off.
Adapting the same idea to a wagon would require a slightly longer wheel base and a large adapter in the rear door opening possibly using the hinge holes for support. As for a different car, a Bug Eye for example, the same concept would apply but the actual mounting spots would have to be explored. The beauty of the Mini shell is the ability to skewer it through thereby supporting all the load on the pole. If you couldn't go completely through, the mounting points would have to take not only the dead load but also a moment (torque) so suspension pickup points or engine mounts would be the place to attach. I know on later Mini shells the hole in the rear seat squib was not open so you're going to have to use the shock towers or something.
I highly recommend a rotisserie for full restoration jobs when it's a bare metal respray. There's no better way to paint the underside and make sure the washprimer, primer, paint and sealer gets into the sills etc than having gravity on your side. It's also the bees knees when you're bending up new brake/fuel/hydrospastic pipes.